We are done with installation of binaries. Now it's time to configure the OAM domain.
Run config.sh located in <Middleware_Home>/wlserver_10.3/common/bin.

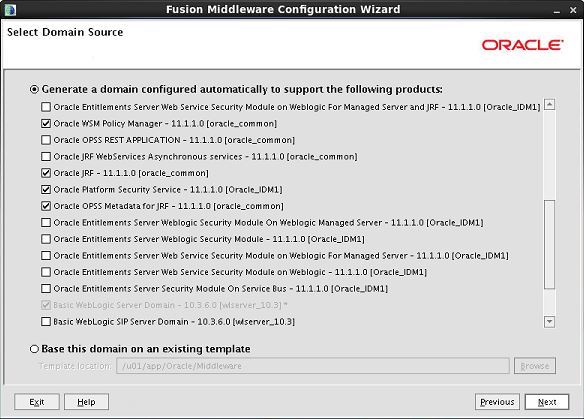
Config.sh will check Middleware directory and list out all the available binaries/services which can be configured.
Select 'Oracle Access Management And Mobile Security Suite - 11.1.2.3.0 [Oracle_IDM1]' and few services will automatically be selected. OAM uses those services in the background.

Mention the name of your domain along with the path of your domain and application location. I am using the default name and path.

Give the Admin name and password used for the first time startup and access your server. Later you can change or create more admin users.

Select the deployment mode and certified JDK

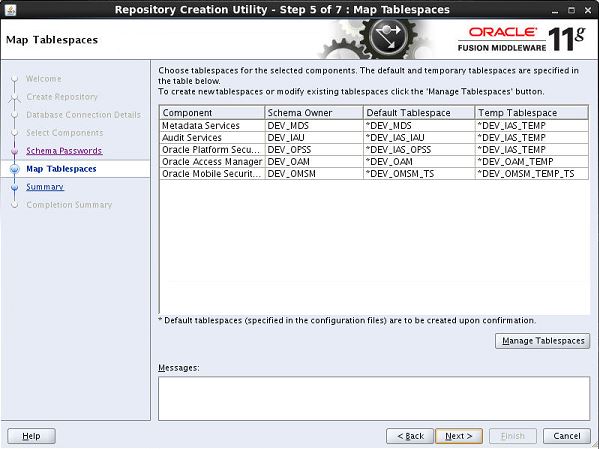
Fill in the Database connection details along with Schema Owner and Password ( the schema we created by running RCU). Select each component schema one at a time because the schema owners are different.

The connection to the schema will be checked using the schema owner name and password. A green tick as status means success. If you are getting a red cross in status, it means connection to that schema has failed. In failure case check 'Connection Result Logs' and try to connect to the same schema from CLI or sql developer using the same schema owner and password.

Select 'Administration Server' and 'Managed Servers,Clusters and Machines'

Fill in your Admin Server name, listening address and port. I am leaving it with default values.

Till PS2 OAM server takes care of Policy management but PS3 onward there will be a dedicated Policy Manager server. Now OAM will need a Policy Manager server to work. I am also configuring Oracle Mobile Security Manager server.
I am proceeding with a single server instances. Later, we will extend this infrastructure to incorporate one more server instance.

Configure a cluster. With single instance we can't leverage the advantages of cluster.

Assign the servers from the left pane to the clusters created.

Create a machine.

Assign the servers from the left pane to the machines created in above step.

Review the summary before clicking create button.


We are done configuring OAM domain but there is still one more step left before we proceed with the configuration of the database security store.
Well, it is always recommended by oracle to upgrade the Oracle Platform Security Services (OPSS) schema that you have created using RCU. OPSS is a separate product and most of the Oracle IDAM suite products uses OPSS.
Launch "psa" from <Middleware_Home>/oracle_common/bin

Select Oracle Platform Security Services.

As OPSS is handles core configurations of the product, it is always recommended to take backups before touching them. As this is a fresh setup and all the DB schema are empty (We haven't run configSecurtityStore.py script). I am selecting the checks and proceeding to the next step.

Give the connection details


As the product is recently launched along with the rcu so it is upgraded to the latest version. I will just proceed till the end of flow.


<Middleware>/oracle_common/common/bin/wlst.sh <IAM_Home>/common/tools/configureSecurityStore.py
-d <domaindir>
-c IAM
-p <opss_schema_pwd>
-m create
Note: Only use 'IAM' to configure the security store.


Just to be sure I will validate my security store by passing validate parameter.
<MW_HOME>/oracle_common/common/bin/wlst.sh <IAM_HOME>/common/tools/configureSecurityStore.py -d <domaindir> -m validate
<MW_HOME>/oracle_common/common/bin/wlst.sh <IAM_HOME>/common/tools/configureSecurityStore.py -d <domaindir> -m validate


I have seen few cases where 'configureSecurityStore.py' script will error out while configuring DB security store. When they run configSecurityStore.py script with create option it errors out with some exception. In such scenarios:
- Run the above validate command. If it says security store not configured then you can again proceed with create option.
- But if it says validation successful you can try starting the server which is (most likely) bound to fail.
- Try running validate_fix. Use validate_fix to fix diagnostics data present in the Security Store.


- If all above steps fails then drop the schema by running RCU. Again create a new schema using the same RCU. Delete the domain and recreate it using config.sh and run configSecurityStore.py script.
When you create domain the configurations are stored in flat file. By running configSecurityStore.py script, you these configuration will be moved to DB in encryped form. If configSecurityStore.py fails the server will not come up or some deplyment will fail.
Now we can start our OAM server.


If you will notice after first startup a new folder has been created 'servers'. All the runtime related files are cached and stored under this directory.
What if we delete this servers folder, what will happen then? Find it out yourself:
- Stop your Admin/Managed server
- Delete server folder.
- Now, start the servers
Thank you for reading.